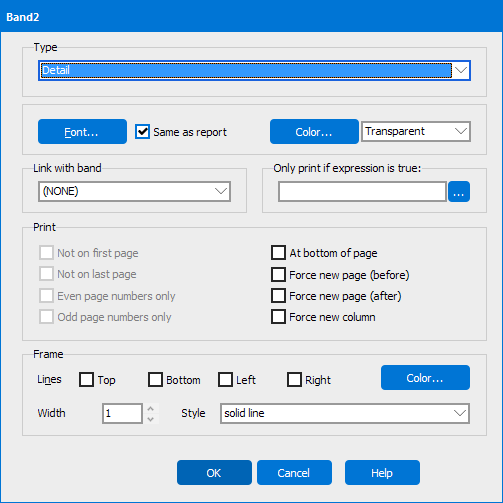
Report Editor - Create/Edit a Band
This page allows you to create a new band or modify the properties of the currently selected band. Double-click the band you wish to modify or select the band and click the Edit button on the toolbar. You cannot use this button to create Band Groups, Child bands or Sub Detail bands (they have their own button for that purpose). Bands in Argos are "placeholders" for data fields, charts, labels, etc. Bands are placed according to what type of band they are, not where the user clicks on the screen. The different types of bands you can create with this tool are:
- Title - prints at the top of the first page (only), just beneath the Page Header band (if it exists). This band is useful for printing the report title, report parameters, etc.
- Page Header - prints at the top of every page. This band is useful for printing the report date, page number, etc.
- Column Header - prints just beneath the Page Header and Title bands (if they exist). Note that Band Groups can force Column Header bands to separate from the Detail band. If you wish to have your column headings just above your Detail band, consider using a Child band for this purpose. You are not required to place column headers in this band, that is just the typical use for it.
- Detail - prints once for each record in the dataset. You should not add a Detail band if one already exists.
- Group Footer - prints at the end of the Band Group. You should not add a Group Footer to a Band Group that already has a Group Footer.
- Summary - prints at the bottom of the last page (only), just after the last Detail record.
- Page Footer - prints at the bottom of every page.
- Loop - prints after each Detail row and will print as many times as indicated in the Print Count property.

You can configure the following properties of the band you are adding:
- Type - select the type of band you want to add to your banded report (see list above).
- Font - changes the font characteristics of text added to the band.
- Color - changes the background color of the band. (Transparent - makes the background color 'see through' so background objects can be seen.)
- Link with band - attaches this band to a band below it in the report so that the following band will not become separated by a page break. (See Report Writer Guide - Link with Band for an example).
- Only print if expression is true - allows you to set a condition, and only print this band if that condition is true.
- Print - allows you to set various print options for this band. Not all options are available for each band type. They include:
- Not on first page
- Not on last page
- Even page numbers only
- Odd page numbers only
- At the bottom of page
- Force new page (before) - Checking this box will force a new page before the object is printed. This option will be ignored if the previous object printed was the Page Header band, the Title band, a previous Group Header band, or the child of a previous Group Header band.
- Force new page (after) - Checking this box will force a new page after the object is printed. This option will be ignored if the object being printed falls on the last page of the report.
- Force new column
- Frame - Controls which borders are drawn around this band, and how they should appear.
- Note: Line styles other than "solid" are only available for frames of width 1.
If you need additional help creating Banded Reports, refer to the Getting Started with Banded Reports page.